
# Integracion con Salesforce
# Introducción
En este tutorial integraremos Salesforce, una plataforma de gestión de las relaciones con los clientes (CRM), con el módulo de Customers de Modyo donde se tienen a los usuarios finales de la plataforma. Esta integración nos permite administrar todos lo usuarios desde un solo lugar y así no cambiar el flujo de trabajo de nuestros equipos de ventas, marketing, organización, etc.
# Requisitos Previos
- Una cuenta a la plataforma Modyo con permisos de Administrador
# Paso 1: Configuración Inicial
Lo primero que tenemos que hacer es ingresar a nuestra cuenta de Salesforce, donde configuraremos la integración con Modyo Platform.
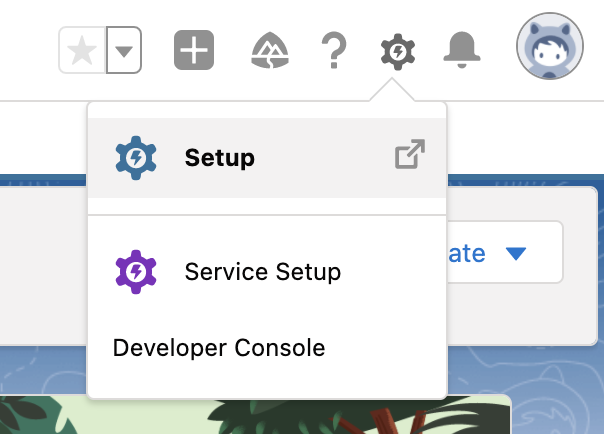
Una vez que ingresamos a nuestra cuenta, haz click en Setup.
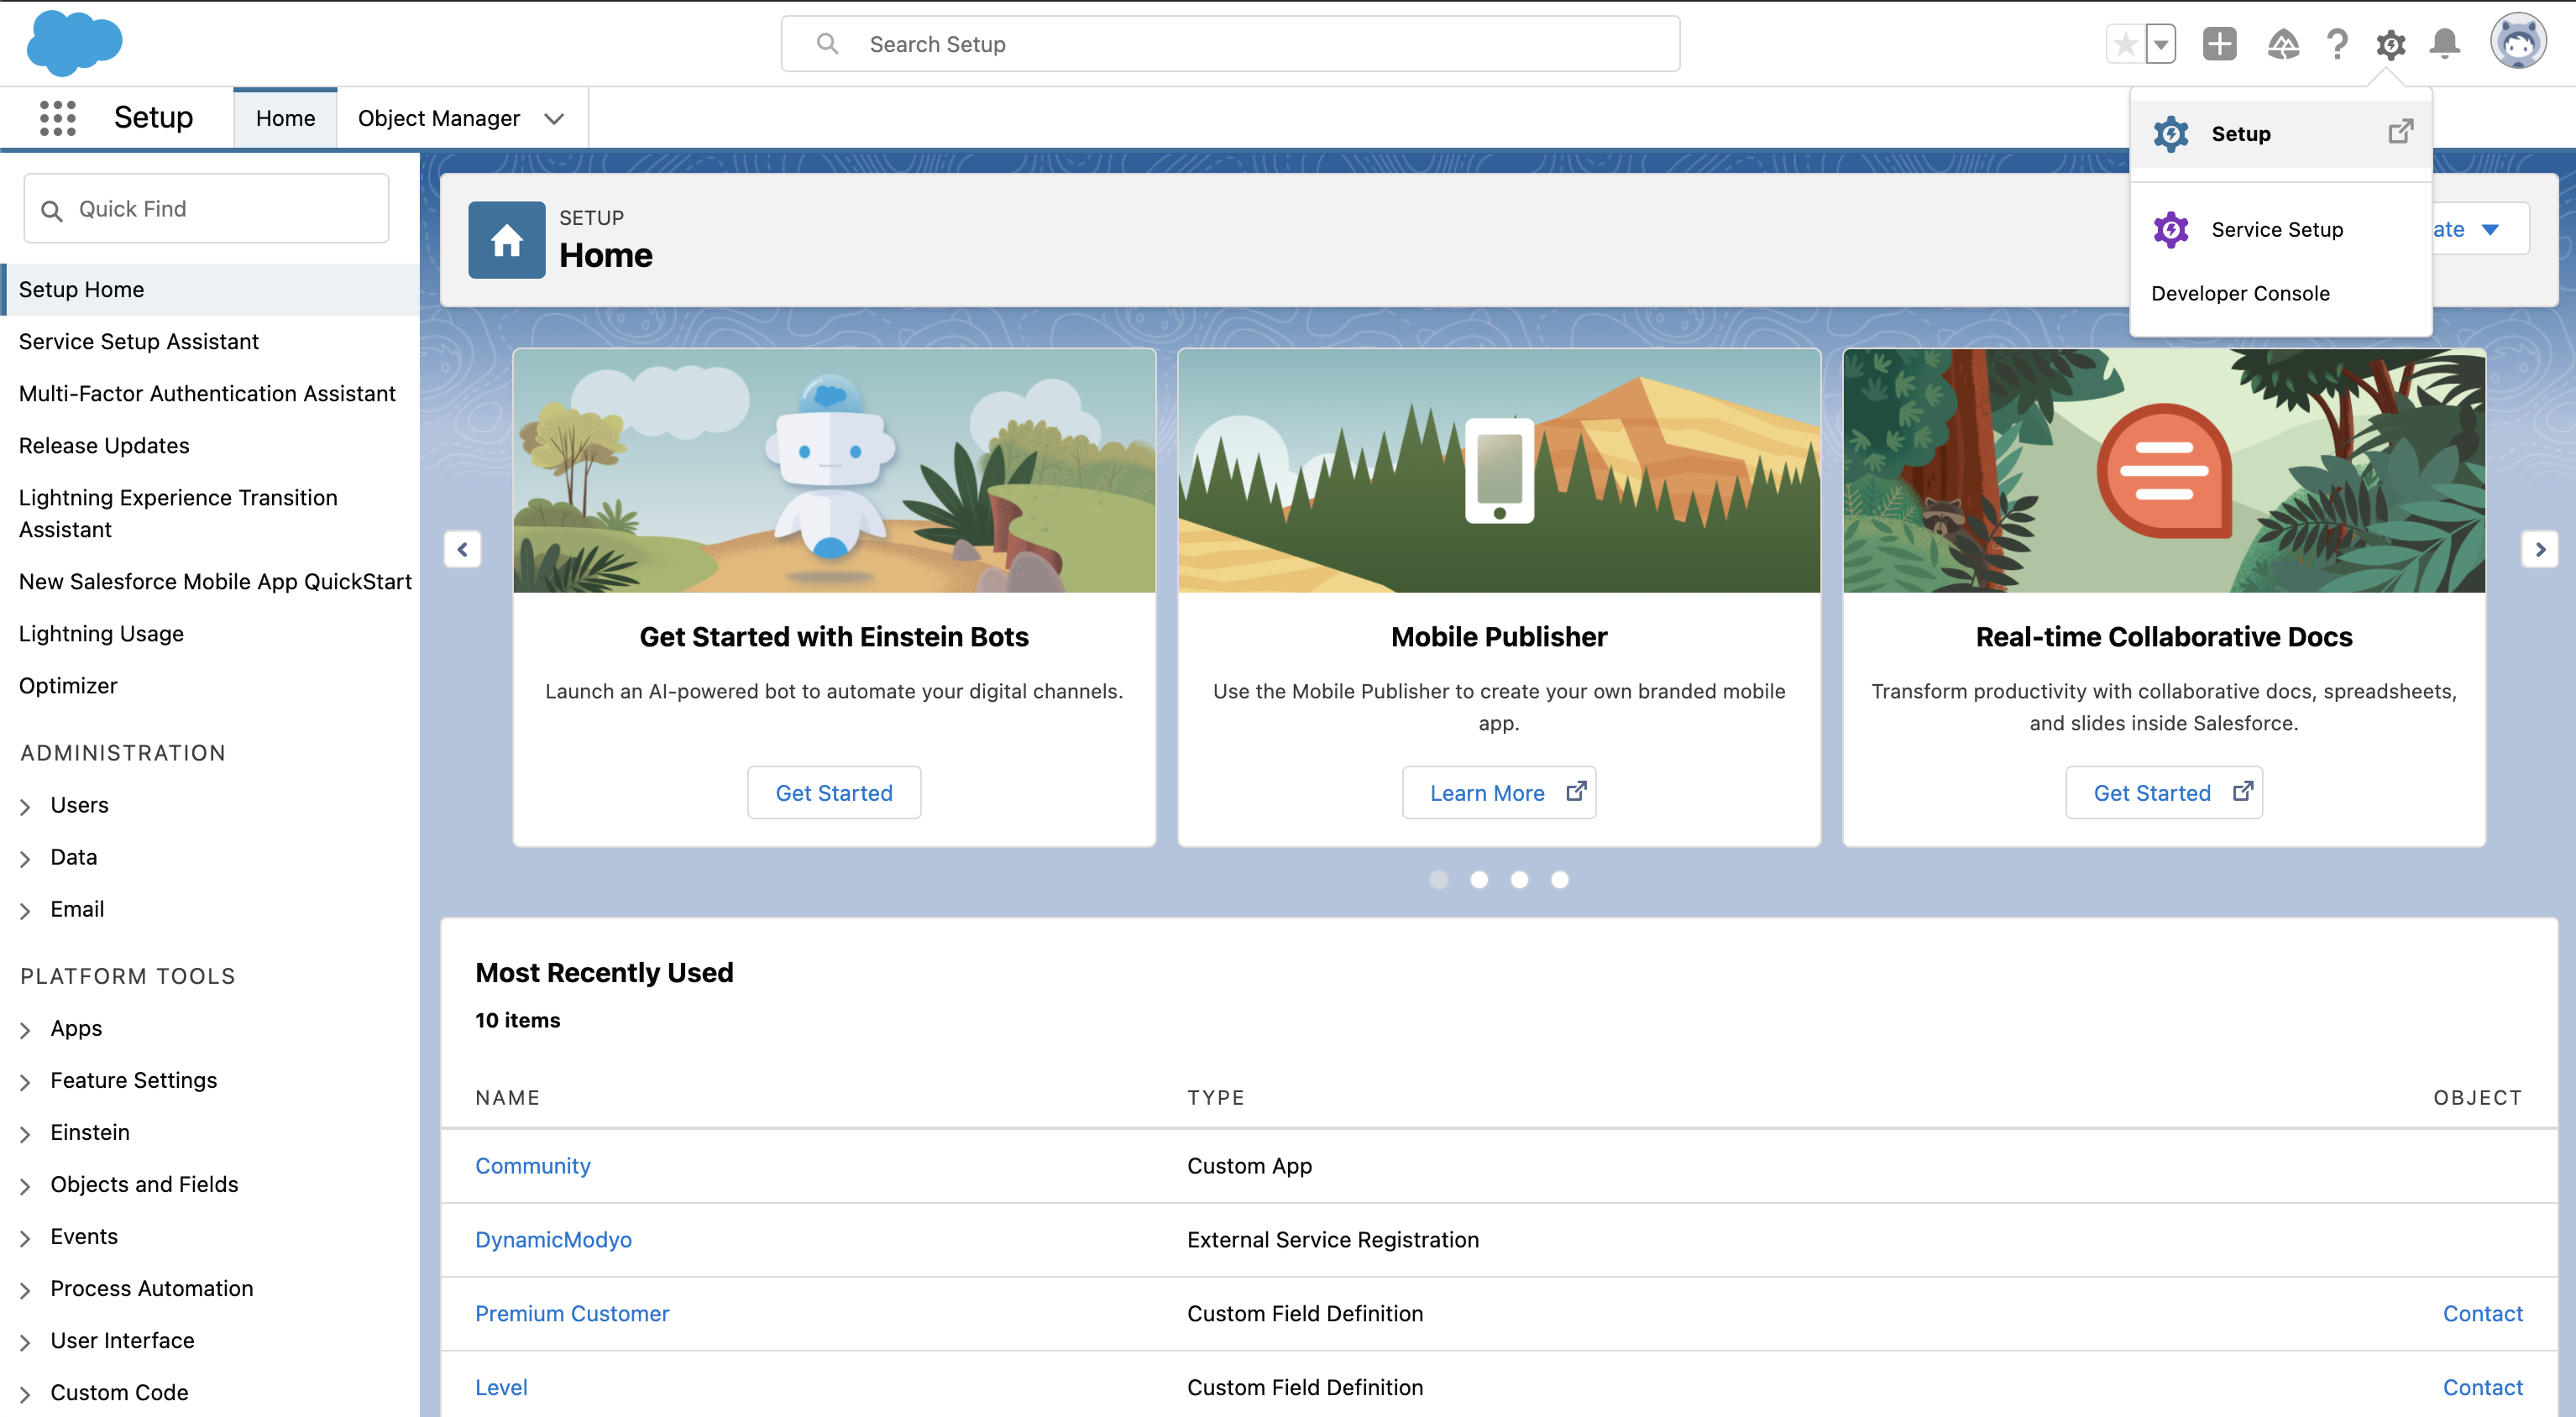
El link de Setup se encuentra en la esquina superior derecha de nuestra pantalla y su ícono es una tuerca:
# Paso 2: Apex Class
Lo primero que tenemos hacer dentro del Setup es en el buscador escribir Apex Classes para ir a generar un nuevo Apex Class, el cual se utilizará para crear el Proveedor de Autenticación.
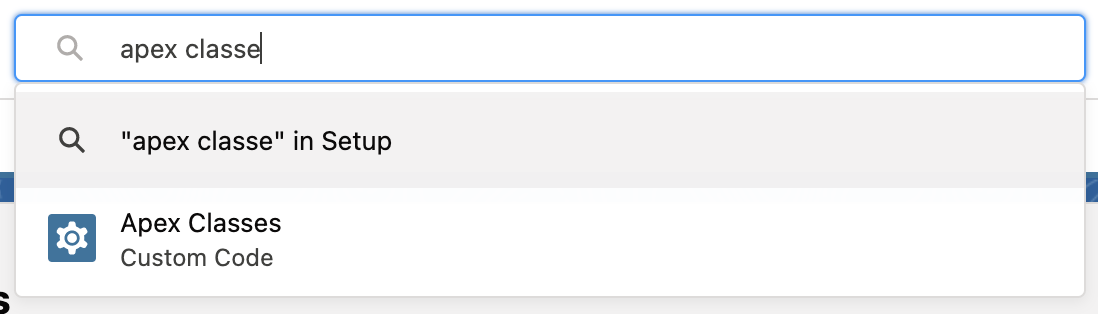
La clase Apex codifica las diferentes reglas y procesos necesarios para autenticar a un usuario con el proveedor de autenticación personalizado.
Para crear una nueva autentificación de usuarios, haz click en Nuevo y pega el código siguiente dentro del editor de Apex class.
global class Modyo_Connector extends Auth.AuthProviderPluginClass {
          // Use this URL for the endpoint that the
          // authentication provider calls back to for configuration.
          public String redirectUrl;
          private String key;
          private String secret;
          // Application redirection to the Modyo_Connector website for
          // authentication and authorization.
          private String authUrl;
          // URI to get the new access token from Modyo using the GET verb.
          private String accessToken;
          // Api name for the custom metadata type created for this auth provider.
          private String customMetadataTypeApiName;
          // Api URL to access the user in Modyo
          private String userAPIUrl;
          private String userLoginUrl;
          // Version of the user api URL to access data from Modyo
          private String userAPIVersionUrl;
          global String getCustomMetadataType() {
              return 'OAuth_provider__mdt';
          }
          global PageReference initiate(Map<string,string>
            authProviderConfiguration, String stateToPropagate)
            {
                authUrl = authProviderConfiguration.get('Auth_Url__c');
                key = authProviderConfiguration.get('Key__c');
                redirectUrl = authProviderConfiguration.get('Redirect_Url__c');
                // Here the developer can build up a request of some sort.
                // Ultimately, they return a URL where we will redirect the user.
                String url = authUrl + '?response_type=code&client_id='+ key +'&scope=&redirect_uri='+ redirectUrl + '&state=' + stateToPropagate;
                return new PageReference(url);
            }
            global Auth.AuthProviderTokenResponse handleCallback(Map<string,string>
            authProviderConfiguration, Auth.AuthProviderCallbackState state )
            {
                // Here, the developer will get the callback with actual protocol.
                // Their responsibility is to return a new object called
                // AuthProviderTokenResponse.
                // This will contain an optional accessToken and refreshToken
                key = authProviderConfiguration.get('Key__c');
                secret = authProviderConfiguration.get('Secret__c');
                accessToken = authProviderConfiguration.get('Access_Token__c');
                Map<String,String> queryParams = state.queryParameters;
                String code = queryParams.get('code');
                String sfdcState = queryParams.get('state');
                return new Auth.AuthProviderTokenResponse('Modyo_Connector', accessToken,
                'refreshToken', sfdcState);
            }
            global Auth.UserData getUserInfo(Map<string,string>
            authProviderConfiguration,
            Auth.AuthProviderTokenResponse response)
            {
                //Here the developer is responsible for constructing an
                //Auth.UserData object

                String token = response.oauthToken;
                userAPIUrl = authProviderConfiguration.get('API_User_Url__c');
                userLoginUrl = authProviderConfiguration.get('API_Login_Url__c');

                // Create HTTP request to send.
                HttpRequest request = new HttpRequest();
                // Set authorization header
                request.setHeader('Authorization', 'Bearer ' + token);
                // Set the endpoint URL.
                request.setEndPoint(userAPIUrl);
                // Set the HTTP verb to GET.
                request.setMethod('GET');
                // Send the HTTP request and get the response.
                // The response is in JSON format.

                Http httpProtocol = new Http();
                HttpResponse res = httpProtocol.send(request);
                String responseBody = res.getBody();
                System.debug(responseBody);
                String locale = 'en-us';
                String userId = getValueFromResponse(responseBody, 'id');
                String fullName = getValueFromResponse(responseBody, 'name');
                String firstName = getValueFromResponse(responseBody, 'first_name');
                String lastName = getValueFromResponse(responseBody, 'last_name');
                String uname = getValueFromResponse(responseBody, 'email');
                return new Auth.UserData(
                    userId,
                    firstName,
                    lastName,
                    fullName,
                    uname,
                    null,
                    uname,
                    locale,
                    'Modyo',
                    userLoginUrl,
                    null
                  );
            }
            private String getValueFromResponse(String response,
            String json_key)
            {
                Map<String, Object> result = (Map<String, Object>)JSON.deserializeUntyped(response);
                String ret = String.valueof(result.get(json_key));
            return ret;
            }
        }
Haz click en guardar.
# Paso 3: Custom Metadata Types
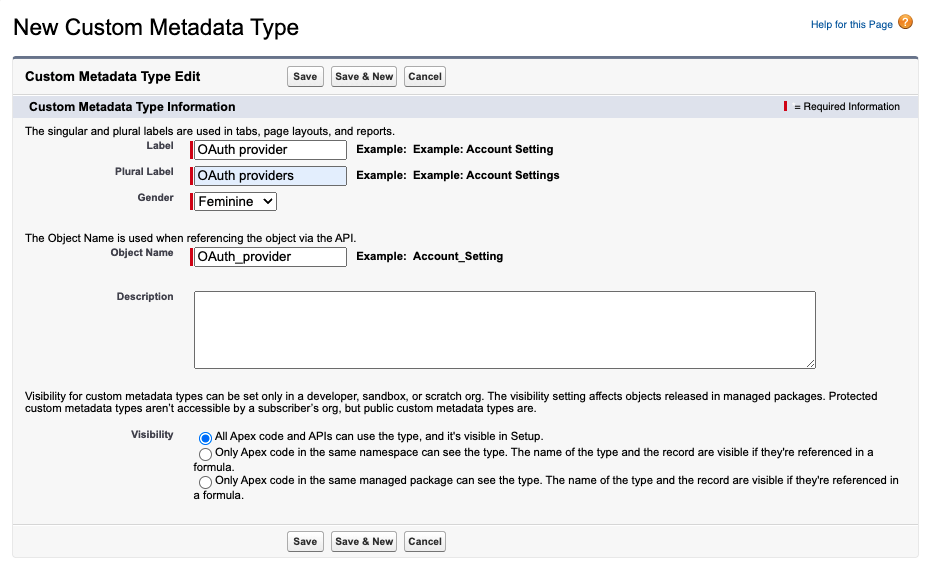
El propósito del Custom Metadata Types es definir qué campos debemos recopilar para la autenticación.
Dentro de estos campos, tendremos los campos por defecto en la autenticación Modyo como el Access Token, Key, Secret, entre otros.
Para configurar los campos busca Custom Metadata Types y haz click en New Custom Metadata Type.
Haz click en Save y en la configuración de Custom Metadata Types , llena la tabla de Custom Fields con los siguientes campos.
| Field Label | Data Type |
| Access_Token | Text(255) |
| API_User_Url | Text(255) |
| Auth_Url | Text(255) |
| Key | Text(255) |
| Redirect_Url | Text(255) |
| Secret | Text(255) |
| API_Login_Url | Text(255) |
# Paso 4: Authentication Providers
Una vez la configuración de Apex Class y el Custom Metadata Types estén listos, hay que generar un proveedor de autenticación, que utilizará la clase Apex recién definida.
Para poder generar un autenticador, desde la plataforma Modyo, dentro de Configuración, haz click en Accesos a la API. Genera un nuevo API access en el boton a la derecha arriba y llena los campos de la siguiente forma, donde la Callback URL es nuestra URL de Salesforce agregándole services/authcallback/Modyo
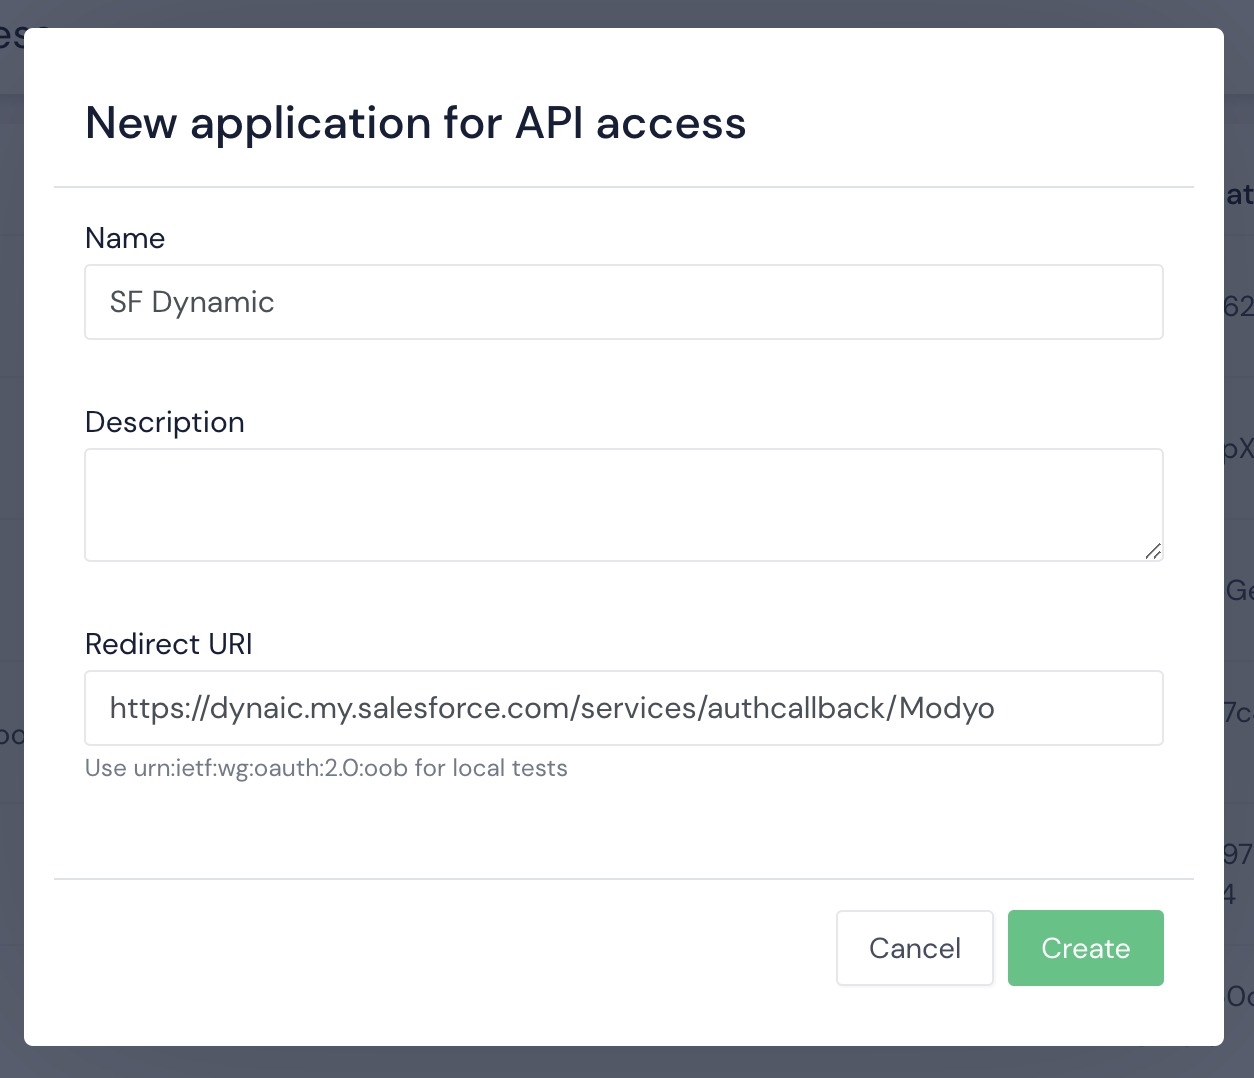
Luego, en Configuración, Equipo, haz click en tu usuario. En la sección de API access haz click en el botón + New Access Token y crea uno con el que ya configuramos SF Dynamic para tener un Access Token para tu usuario.
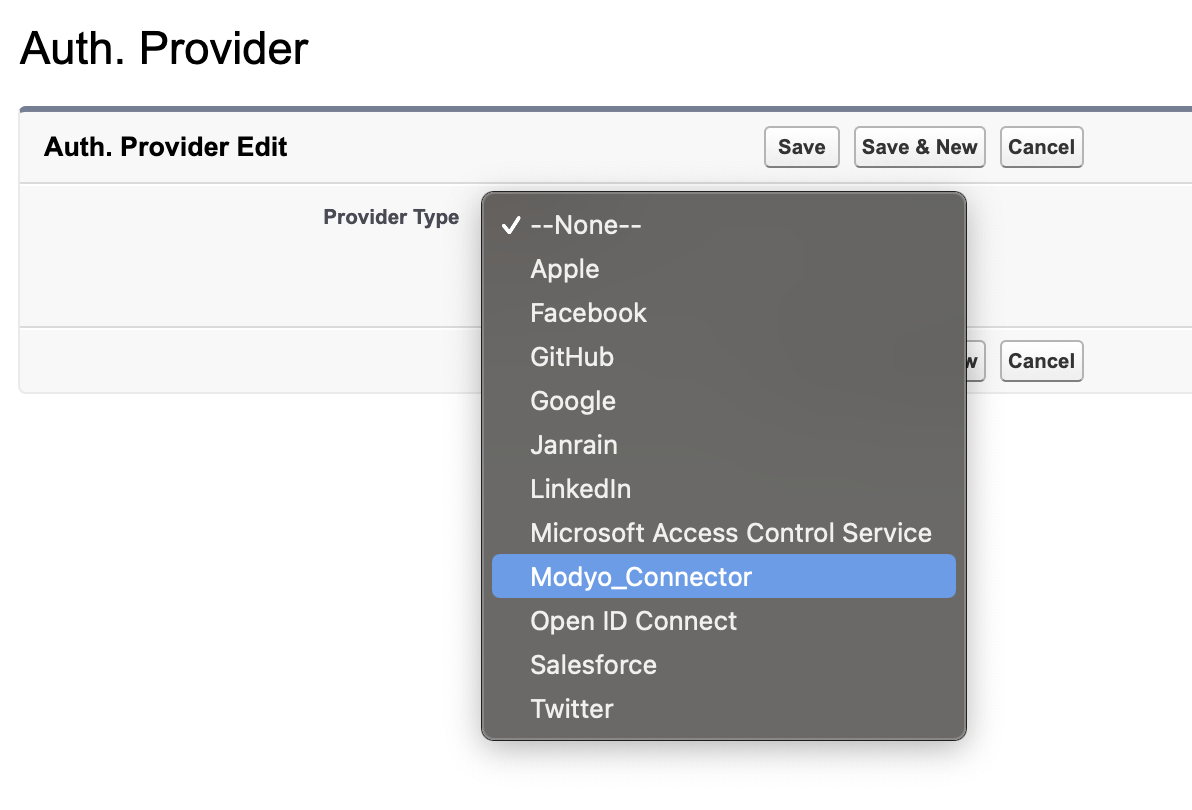
Luego de tener la configuración en Modyo, volvemos a Salesforce. Dentro de Setup, ve a la sección Auth. Providers.
Para crear uno nuevo, haz click en New y dentro de el listado seleccionamos Modyo_Connector
Llenamos los siguientes datos:
| Name | Modyo |
| URL Suffix | Modyo |
| Access_Token | [ Team - API access ] |
| API_User_Url | [ Modyo Account ]/api/admin/admin_users/me |
| Auth_Url | [ Modyo Account ]/admin/oauth/authorize |
| Key | [ API access - Application Id ] |
| Redirect_Url | [ API access - Callback URL ] |
| Secret | [ API access - Callback URL ] |
| API_Login_Url | [ Modyo Account ]/admin/login |
| Registration Handler | AutocreatedRegHandler1626881065042 |
| Execute As | [ Modyo User ] |
# Paso 5: Named Credentials
Las "Named Credentials" permiten a los usuarios autenticar a un proveedor de servicios externo. Hay varias opciones predeterminadas, para conectarnos a Modyo, tenemos que crear una autenticación personalizada.
Para generar una vamos a buscar Named Credentials dentro de Setup, y hacemos click en New Named Credential. Llenamos los campos de la siguiente forma:
| Label | Modyo |
| Name | Modyo |
| URL | [account.url]/api/admin |
| Identity Type | Named Pricipal |
| Authentication Protocol | OAith 2.0 |
| Authentication Provider | [ El que ya creamos ] |
| Generate Authorization Header | Check |
| Allow Merge Fields in HTTP Header | Check |
| Allow Merge Fields in HTTP Body | Check |
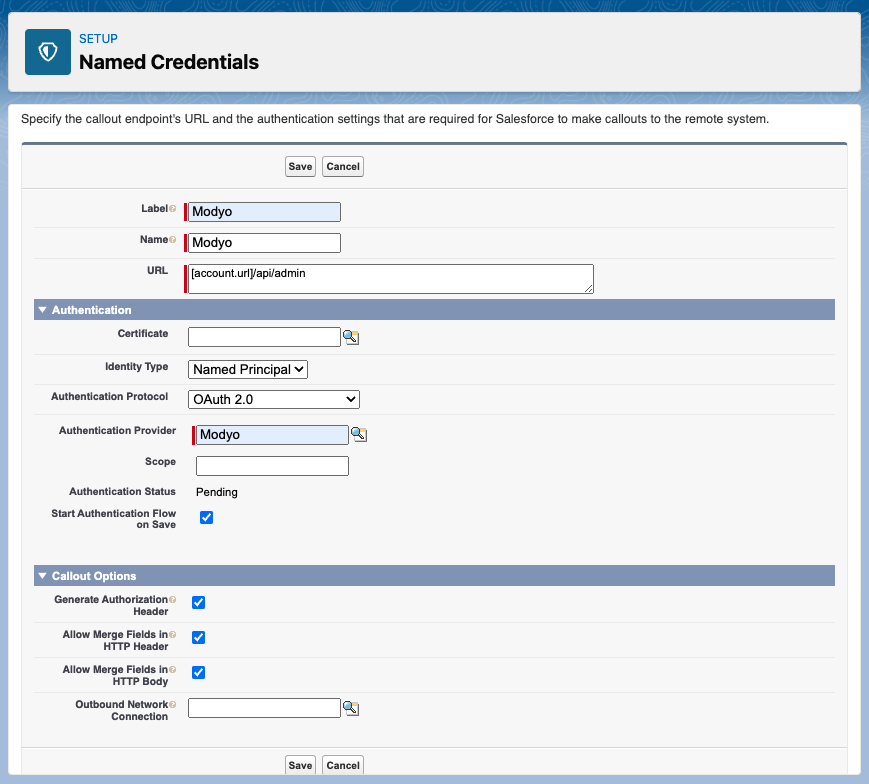
Haz click en Save.
# Paso 6: Remote Site
El último paso es la definición del servicio externo dentro de Salesforce.
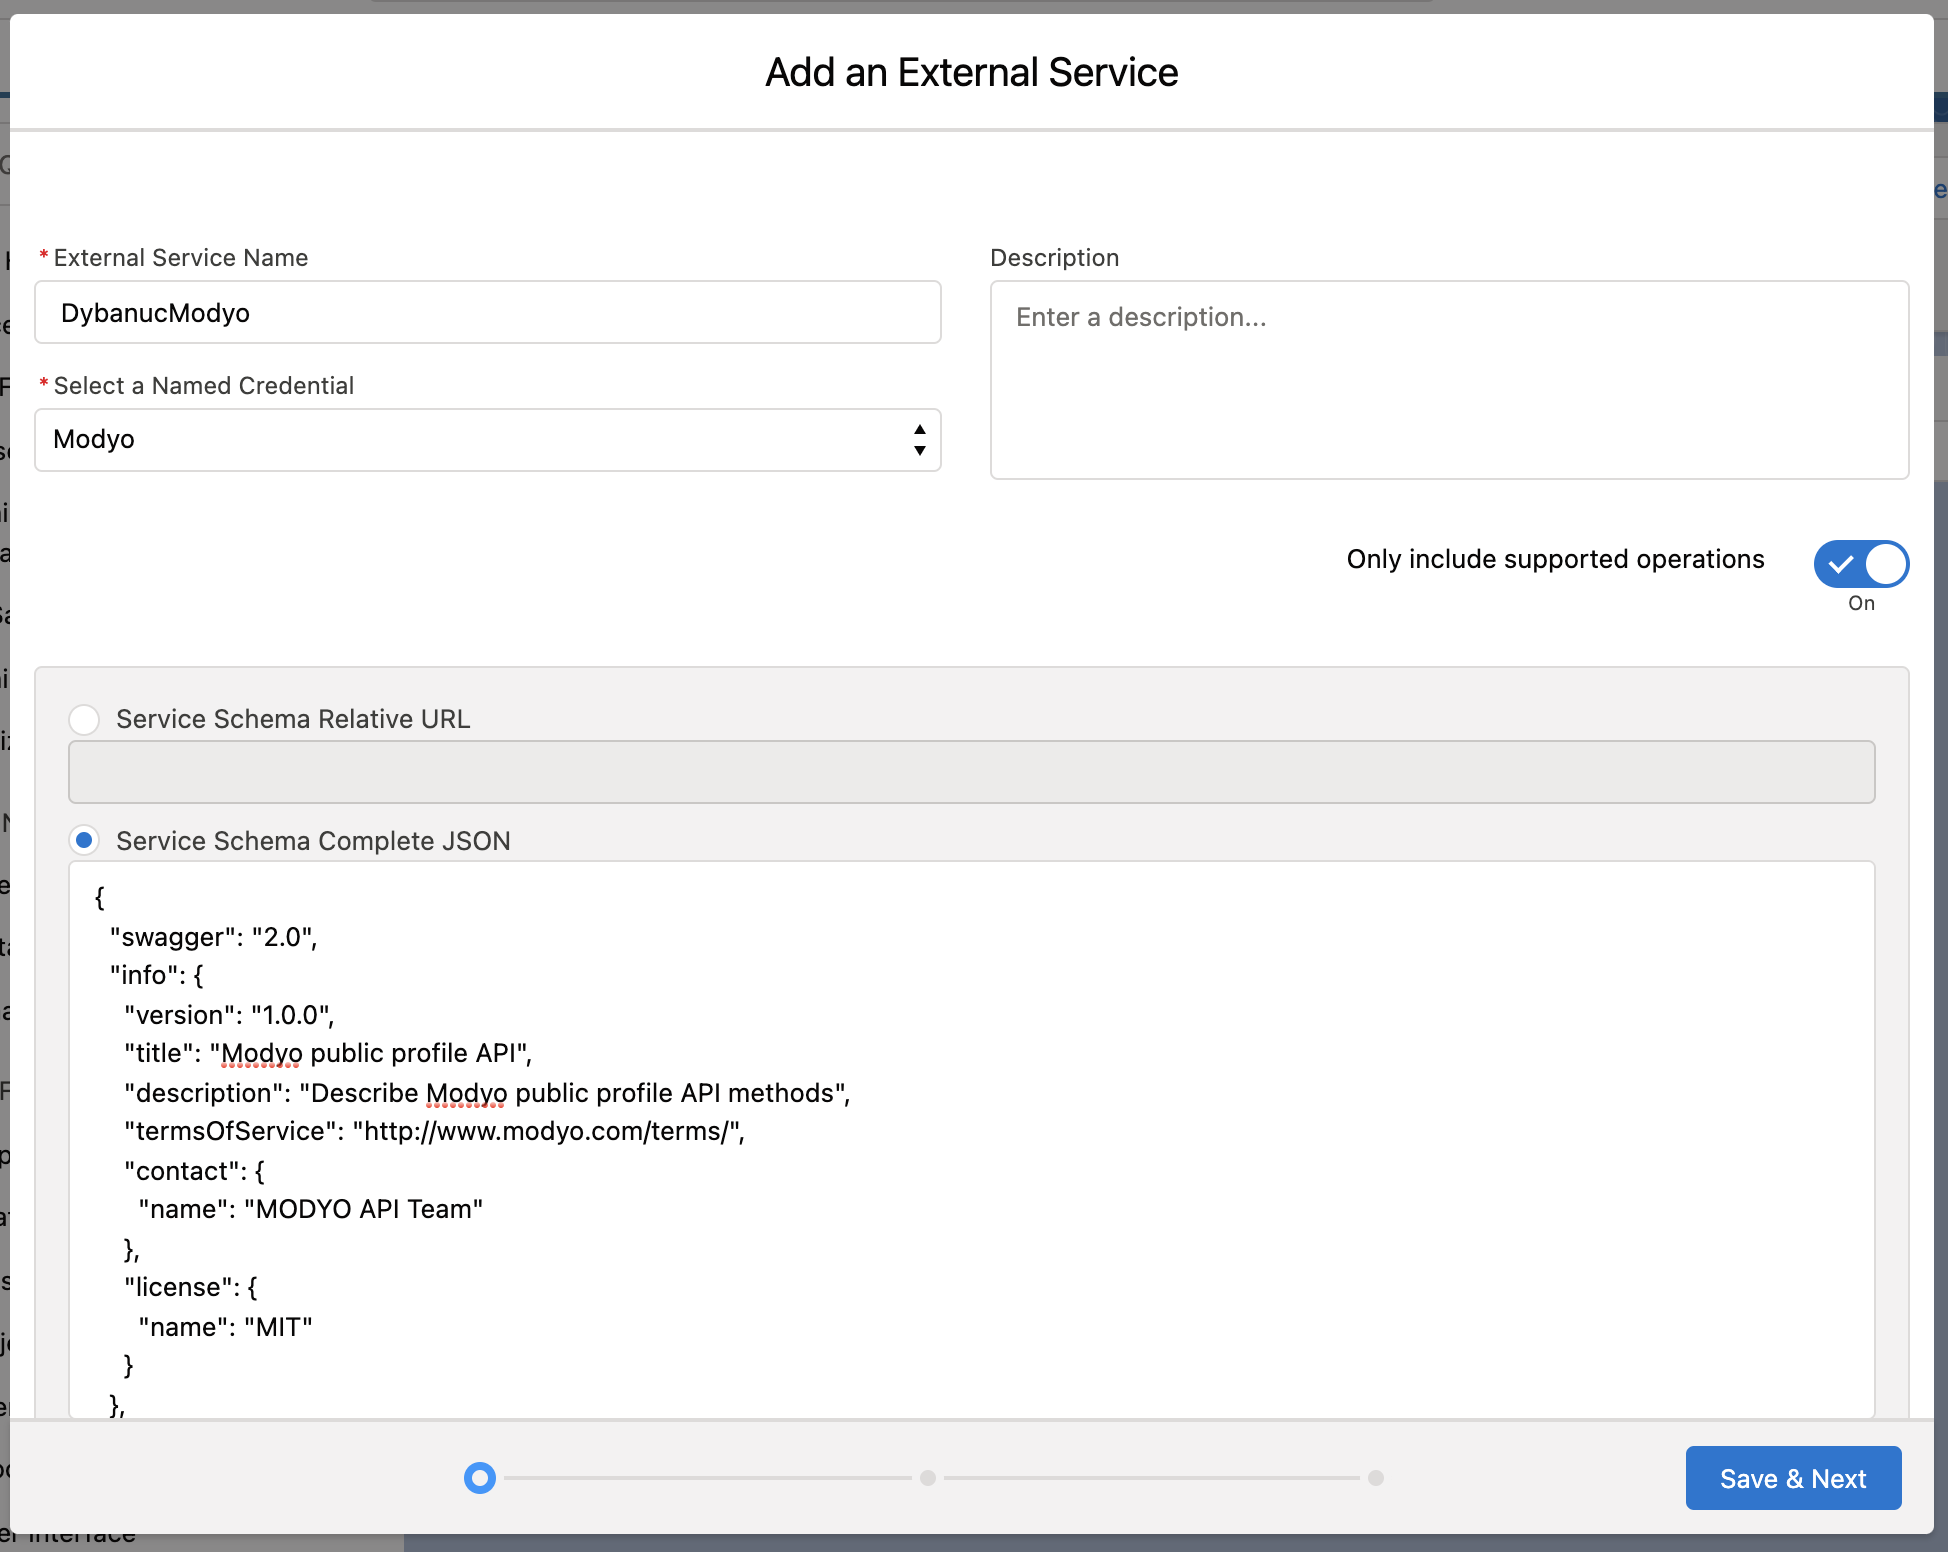
Los servicios externos nos permiten conectar Salesforce a servicios de terceros, compartiendo un esquema de API en formato OpenAPI y las encontramos en Setup -> External services.
Para generar la integración, crea un nuevo Servicio Externo haciendo click en el botón New External Service a la derecha arriba en la pantalla.
Escribe un nombre, selecciona el Named Credential que creaste y en la parte inferior pegamos el siguiente código, seleccionando Service Schema Complete JSON
{
  "swagger": "2.0",
  "info": {
    "version": "1.0.0",
    "title": "Modyo Admin API",
    "description": "Describe Modyo Admin API methods",
    "termsOfService": "http://www.modyo.com/terms/",
    "contact": {
      "name": "MODYO API Team"
    },
    "license": {
      "name": "MIT"
    }
  },
  "securityDefinitions": {
    "access_token": {
      "type": "apiKey",
      "in": "header",
      "name": "Authorization"
    }
  },
  "security": [{
    "access_token": []
  }],
  "basePath": "/",
  "consumes": [
    "application/json"
  ],
  "produces": [
    "application/json; charset=utf-8"
  ],
  "paths": {
    "/account": {
      "put": {
        "summary": "Update an Account",
        "tags": [
          "Accounts"
        ],
        "parameters": [{
          "name": "account",
          "in": "body",
          "required": true,
          "schema": {
            "$ref": "#/definitions/AccountInput"
          }
        }],
        "responses": {
          "200": {
            "description": "Successful updated",
            "schema": {
              "$ref": "#/definitions/Account"
            }
          },
          "409": {
            "description": "Conflict"
          }
        }
      }
    }
  },
  "definitions": {
    "AccountInput": {
      "properties": {
        "favicon_id": {
          "type": "integer",
          "description": "Favicon ID"
        },
        "dismiss_home_steps": {
          "type": "boolean"
        },
        "logo_id": {
          "type": "integer",
          "description": "Logo ID"
        },
        "cors_enabled": {
          "type": "boolean"
        },
        "cors_allow_all": {
          "type": "boolean"
        },
        "cors_allowed_origins": {
          "type": "string",
          "description": "By default, site custom domains are included once CORS is enabled. To grant external domains access, input them in a comma-separated list. Wildcards are not allowed.",
          "example": "http://sub.mydomain.com, http://spa.mydomain.com"
        },
        "delivery_token_expiration": {
          "type": "integer"
        },
        "name": {
          "type": "string"
        },
        "time_zone": {
          "type": "string"
        },
        "host": {
          "type": "string"
        },
        "default_site_id": {
          "type": "integer"
        },
        "default_site_permanent_redirect": {
          "type": "boolean"
        },
        "robots_enabled": {
          "type": "boolean"
        },
        "sitemap_enabled": {
          "type": "boolean"
        },
        "google_key": {
          "type": "string"
        },
        "lang": {
          "type": "string"
        },
        "min_length_value": {
          "type": "integer",
          "example": 8,
          "minimum": 8,
          "maximum": 128
        },
        "require_lowercase_enabled": {
          "type": "boolean"
        },
        "require_uppercase_enabled": {
          "type": "boolean"
        },
        "require_symbols_enabled": {
          "type": "boolean"
        },
        "expire_after": {
          "type": "integer",
          "example": 300,
          "enum": [
            300,
            600,
            900,
            1200,
            1500,
            1800,
            2700,
            3600,
            5400,
            7200,
            14400,
            28800,
            57600,
            86400,
            172800,
            259200,
            345600,
            432000,
            518400,
            604800,
            1209600
          ],
          "description": "Time in minutes"
        },
        "otp_required": {
          "type": "boolean",
          "example": false
        }
      }
    },
    "Account": {
      "properties": {
        "id": {
          "type": "integer",
          "example": 1
        },
        "name": {
          "type": "string",
          "example": "Modyo Cloud"
        },
        "host": {
          "type": "string",
          "example": "company"
        },
        "time_zone": {
          "type": "string",
          "example": "Santiago"
        },
        "lang": {
          "type": "string",
          "example": "en"
        },
        "uuid": {
          "type": "string",
          "example": "a24f87bd-3abd-4b9d-973e-3e4e9676c345"
        },
        "google_key": {
          "type": "string",
          "example": "AIzaSyDmuYmbFpzTdIxHy"
        },
        "options": {
          "type": "string"
        },
        "cors_allowed_origins": {
          "type": "string",
          "example": "http://sub.mydomain.com, http://spa.mydomain.com"
        },
        "delivery_token_private_key": {
          "type": "string",
          "description": "Delivery token private key as hexdigest"
        },
        "close_scheduled": {
          "type": "boolean",
          "example": true,
          "enum": [
            false,
            true
          ]
        },
        "cors_enabled": {
          "type": "boolean",
          "example": true,
          "enum": [
            false,
            true
          ]
        },
        "cors_allow_all": {
          "type": "boolean",
          "example": true,
          "enum": [
            false,
            true
          ]
        },
        "owner_id": {
          "type": "integer",
          "example": 1
        },
        "status": {
          "type": "integer",
          "example": 1
        },
        "subscription_id": {
          "type": "integer",
          "example": 1
        },
        "default_site_id": {
          "type": "integer",
          "example": 1
        },
        "logo_id": {
          "type": "integer",
          "example": 1
        },
        "favicon_id": {
          "type": "integer",
          "example": 1
        },
        "delivery_token_expiration": {
          "type": "integer",
          "example": 1
        },
        "created_at": {
          "type": "string",
          "format": "date-time",
          "example": "2019-10-08T16:08:55.000-03:00"
        },
        "updated_at": {
          "type": "string",
          "format": "date-time",
          "example": "2019-10-08T16:08:55.000-03:00"
        }
      }
    }
  }
}
Haz click en Save & Next, selecciona todos lo operadores y haz click en Next y Done.
Haz click en Save & Next, selecciona todos lo operadores y haz click en Next y Done.
Dentro de Setup, haz click en Contact para crear los campos que necesitaremos.
| Modyo ID | Text(255) (External ID) (Unique Case Insensitive) |
| Premium Customer | Checkbox |
Marcar todo en Visible y guardar.
Luego vamos a ir a la cuenta en Modyo, selecciona Customers y haz click en Realms. Selecciona tu Reino y una vez dentro, selecciona Configuración de Reino y haz click en Custom fields, haz click en New Custom Field y llena los siguientes campos:
| Field type | Checkbox |
| Field name | Premium Customer |
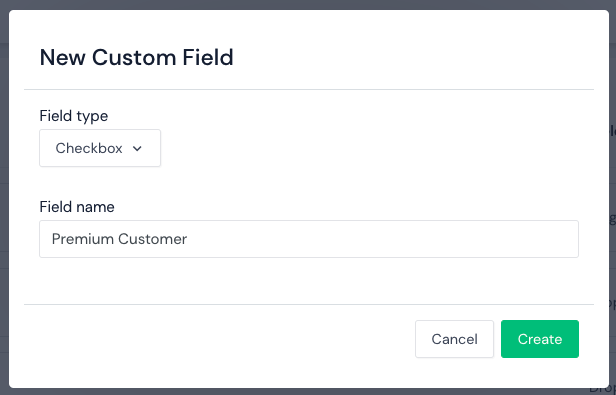
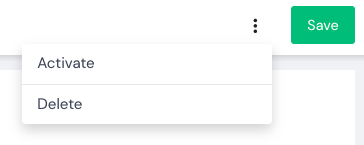
Haz click en Create, lo activamos en los 3 puntos y guardamos.
# Paso 8: Creación de Flow
Una vez terminada la configuración para conectar Salesforce con Modyo, se tiene que crear el flujo para sincronizar los usuarios de Salesforce con Modyo.
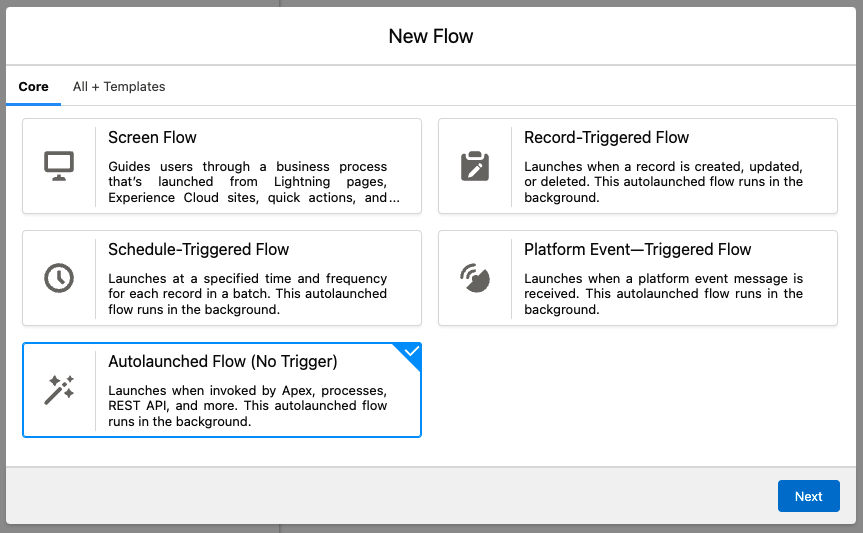
Para esto, ve a Setup -> Flows y haz click a New Flow. Selecciona Autolaunched Flow y luego Freeform.
Para comenzar, ve a la pestaña Manager y a crear nuevos recursos.
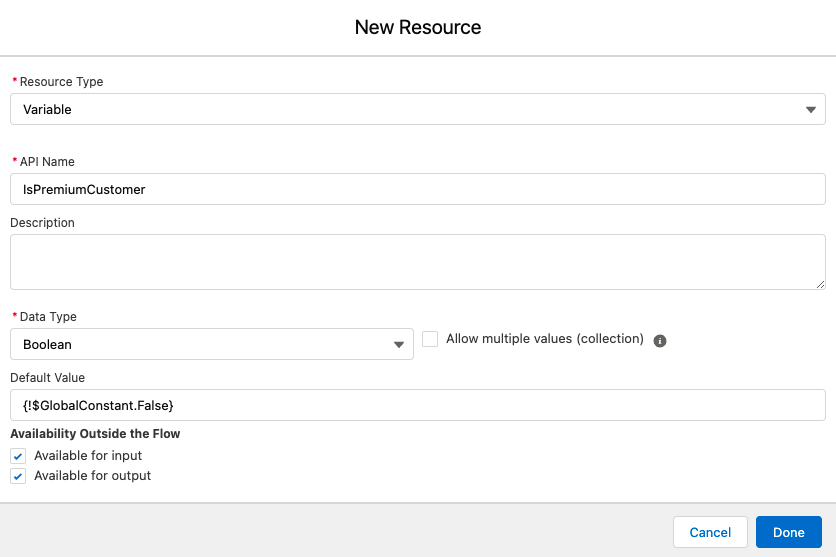
Crea una nueva variable llamada IsPremiumCustomer del Tipo Boolean y de valor por defecto {!$GlobalConstant.False}, habilita los dos campos de abajo y haz click en Done.
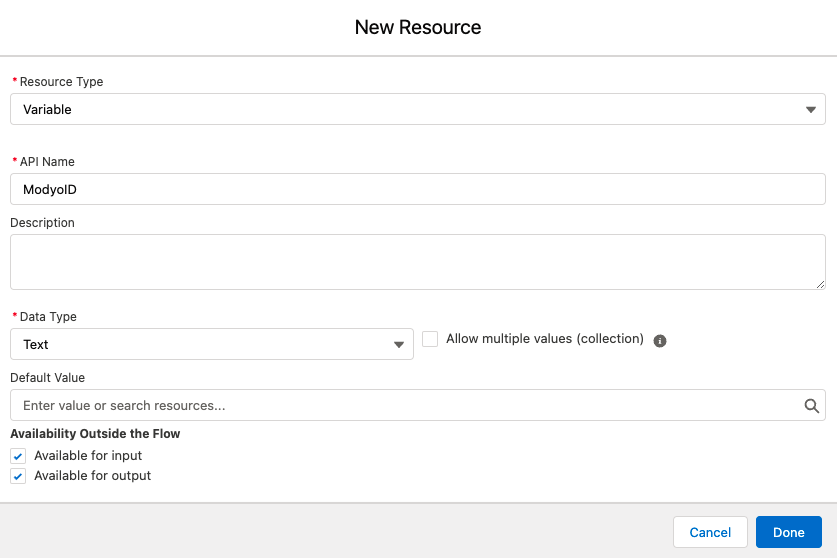
Crea una nueva variable ModyoID de tipo Text y al igual que el anterior, habilita for input y Available for output.
Luego crea otra variable llamada DynamicCustomField y a diferencia de las anteioriores en Data Type selecciona Apex-Defined. En Apex Class llenamos con ExternalService__DynamicModyo_UserCustomField, habilita input y output, y hacemos click en Done.
Repite el mismo procedimiento pero cambiando el nombre por DynamicUserInput y Apex Class por ExternalService__DynamicModyo_UserInput.
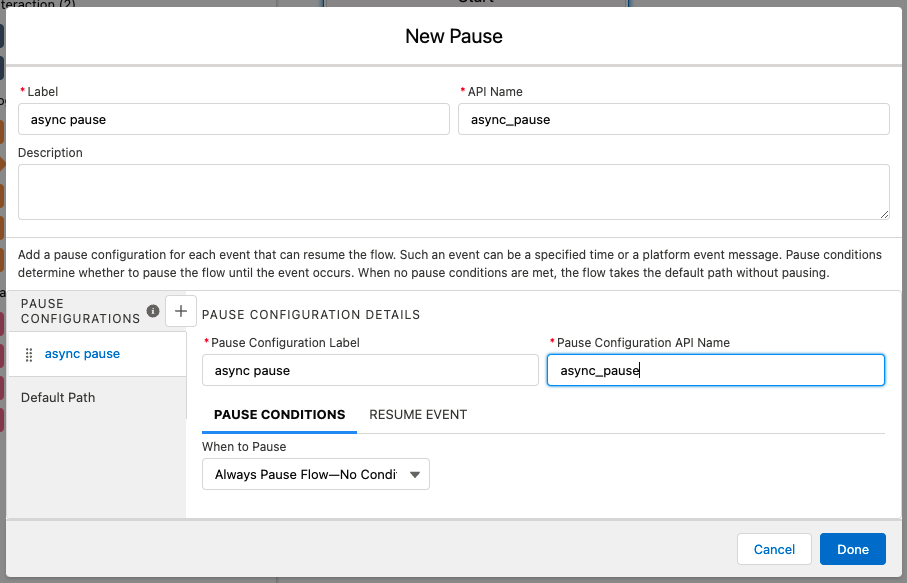
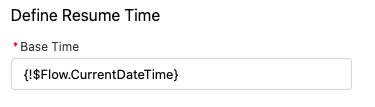
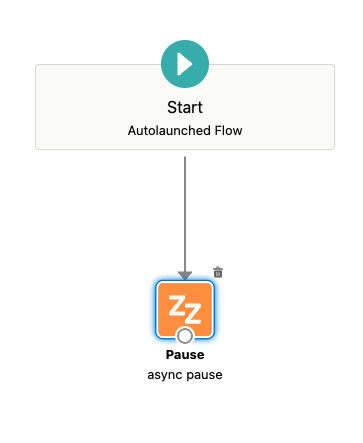
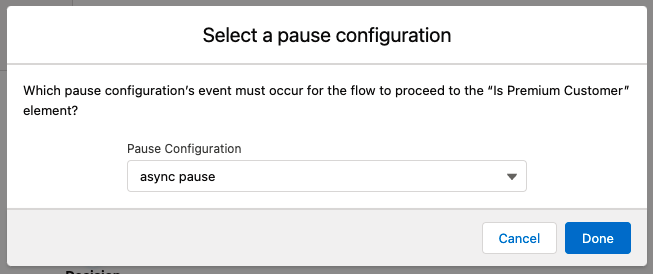
Una vez creadas las Variables, vuelve a la pestaña de Elements y agrega al flujo un Pause, llamado async pause y dentro de Resume event agrega {!$Flow.CurrentDateTime} en Base Time dentro de Define Resume Time.
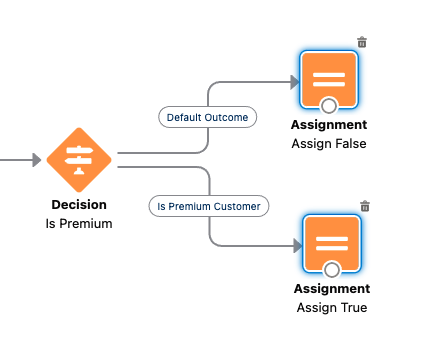
Ahora se tienen que unir los puntos.
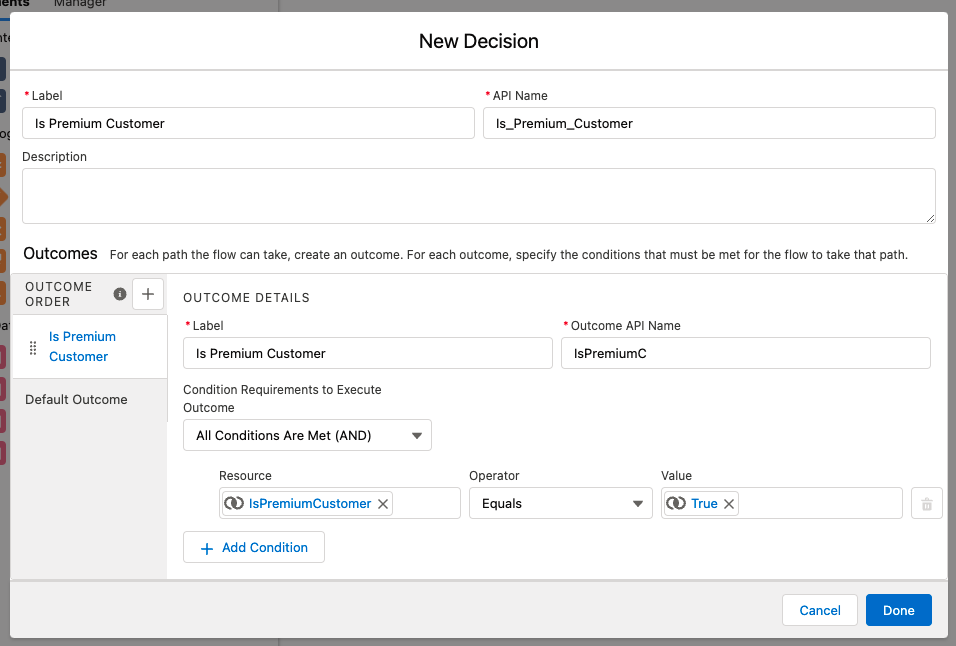
Agrega un Decision al flujo, llamado Is Premium Customer y llénalo con los siguientes campos:
| Label | Is Premium Customer |
| API Name | Is_Premium_Customer |
| Label | Is Premium Customer |
| Outcome API Name | IsPremiumC |
| Condition Requirements to Execute Outcome | IsPremiumC |
| Outcome API Name | All Condition Are Met (AND) |
| Resource | {!IsPremiumCustomer} |
| Operator | Equals |
| Value | {!$GlobalConstant.True} |
Luego conecta los puntos activando la pausa.
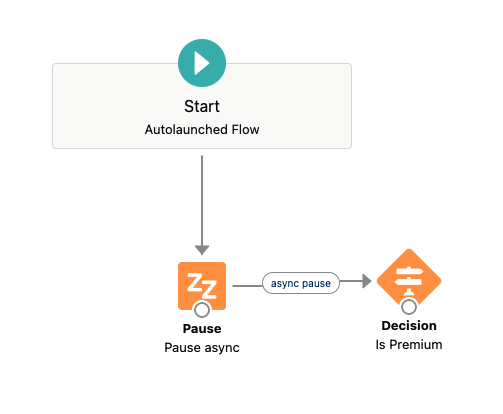
Y el resultado luce algo asi:
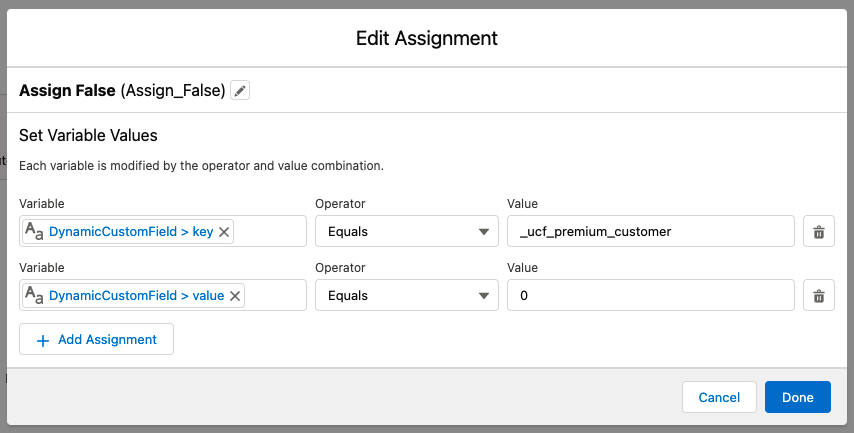
Ahora vamos a realizar dos Assignment dependiendo del Decision, uno para Default Outcome y otro para Is Premium Customer con los siguientes atributos:
Default Outcome:

Is Premium Customer:
Luego de crear los Assignments, se conectan de la siguiente forma:
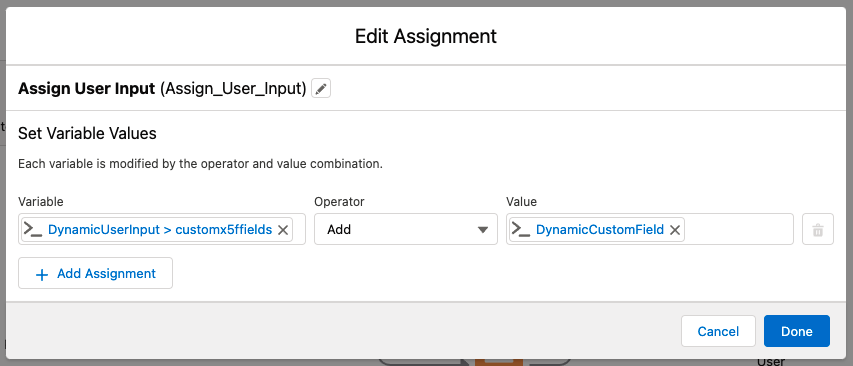
Ahora que el input es true o false, vamos a generar un nuevo Assignment con los siguientes campos:
| Variable | {!DynamicUserInput.customx5ffields} |
| Operator | Add |
| Value | {!DynamicCustomField} |
Para terminar el flujo, se agrega un útimo elemento Interaction, especifícamente un Action llamado Update_Dynamic_User.
En el buscador de actions, haz click en putUsersByUser_id:
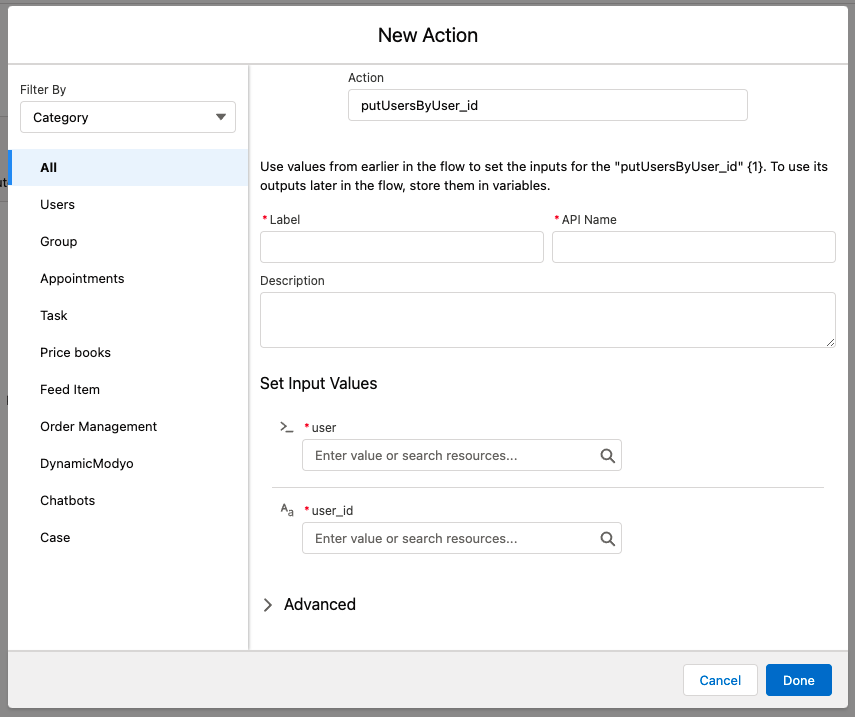
Completa los siguientes datos:
| Label | Uptdate Dynamic User |
| user | {!DynamicUserInput} |
| user_id | {!ModyoID} |
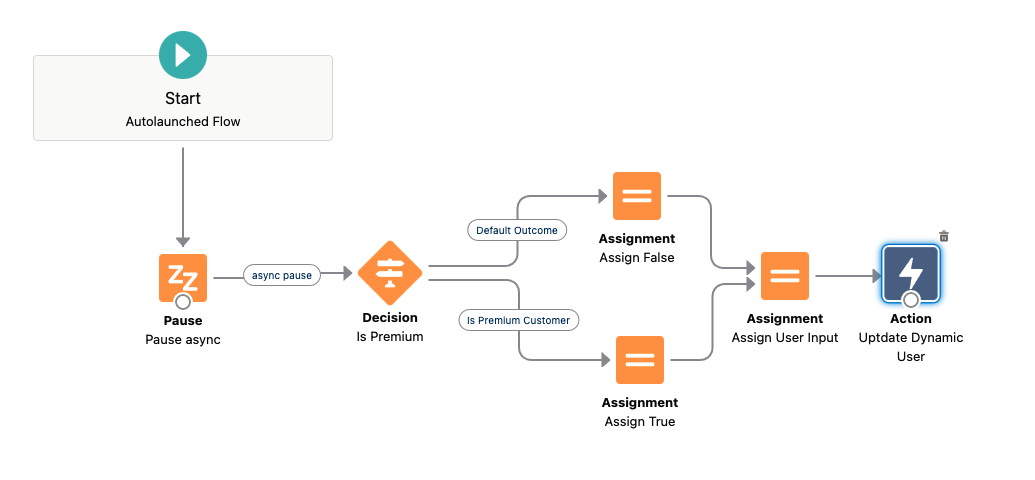
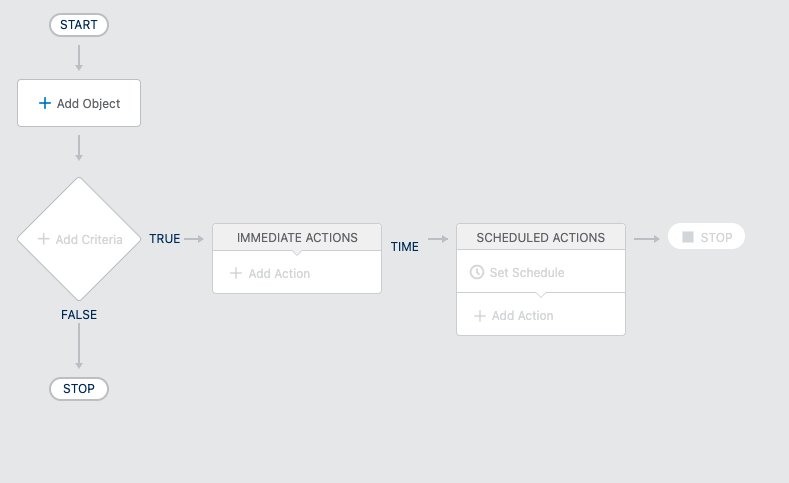
Y conecta todos los puntos para que el Flujo quede de la siguiente forma:
Para finalizar, guarda y prueba que esté funcionando correctamente.
# Paso 9: Creación de Process
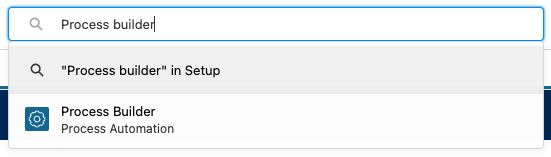
Ahora tenemos que buscar Process builder en el buscador,
Y genera uno nuevo con el nombre Change Modyo Customer y en The process starts when seleccion A record changes, que se ve así:
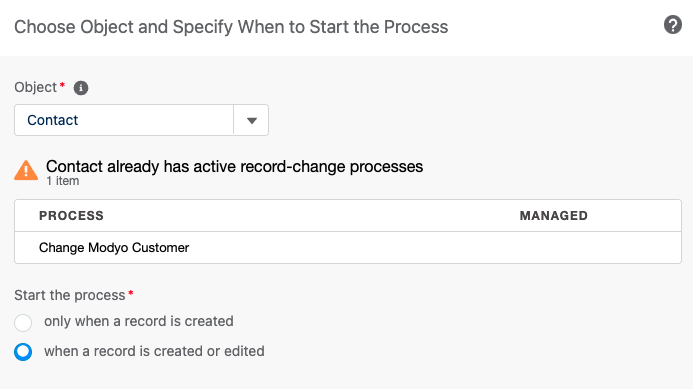
Luego haz click en Add Object, en Object agrega Contact, selecciona when a record is created or edited y haz click en guardar.
Luego haz click en Add Criteria y llena los siguientes campos:
| Criteria Name | Customer Status Changed |
| Criteria for Executing Actions | Conditions are met |
| Conditions | All of the conditions are met (AND) |
EN la tabla de Set Conditions
| Field | Operator | Type | Value |
| [Contact].Premium_Customer__c | Is changed | Boolean | True |
| [Contact].Modyo_ID__c | Is null | Boolean | False |
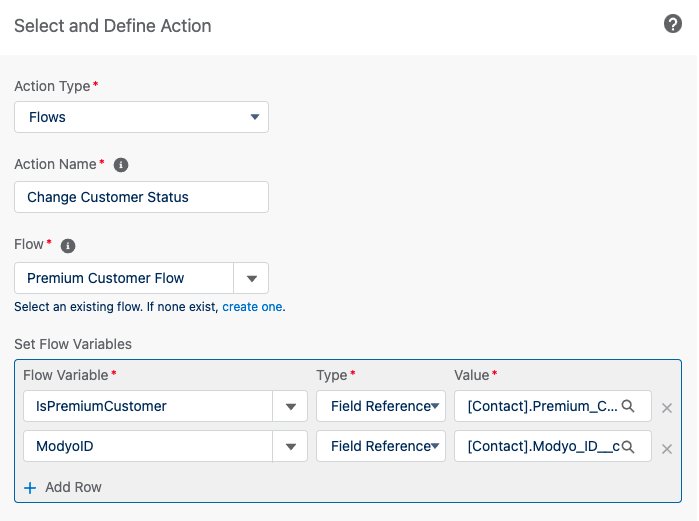
Con esto nos aseguramos que el contacto tenga Modyo ID, click Save y en IMMEDIATE ACTIONS haz click en Add Action con los siguientes datos:
| Action Type | Flows |
| Action Name | Change Customer Status |
| Flow | Premium Customer Flow |
En Set Flow Variables agrega dos renglones con lo siguiente:
| Flow Variable | Type | Value |
| IsPremiumCustomer | Field Reference | Premium Customer |
| ModyoID | Field Reference | Modyo ID |
Haz click en Activate.
# Conclusiones
¡Felicidades! Haz finalizado el tutorial, para poder probar que este todo esté bien, tenemos que crear un usuario llenando los campos obligatorios (First Name, Last Name, Email y Modyo ID).
Para conocer el ID del usuario en Modyo lo podemos hacer a través de la API de Customers en la siguiente url {acount.url}/customers/{realm_uid}/users o en la plataforma Modyo, haciendo click al usuario dentro de Reinos. El Modyo ID será localizado como parte de la URL y se ve algo como: 987eb795-9476-49f7-b511-efb5ba3f07de.